Node.js Raspberry Pi GPIO - LED and Pushbutton
同时使用输入和输出
在上一章中,我们学习了如何使用 Raspberry Pi 及其 GPIO 来让 LED 闪烁。
为此,我们使用了一个 GPIO 引脚作为“输出”。
在本章中,我们将使用另一个 GPIO 引脚作为“输入”。
我们希望 LED 在按下连接到面包板的按钮时点亮,而不是闪烁 5 秒。
What do we need?
在本章中,我们将创建一个简单的示例,其中通过按钮控制 LED 灯。
For this you need
- A Raspberry Pi with Raspian, internet, SSH, with Node.js installed
- Node.js 的 onoff 模块
- 1 x Breadboard
- 1 x 68 欧姆电阻
- 1 x 1k 欧姆电阻
- 1 x 直插 LED
- 1 x 按钮
- 4 x Female to male jumper wires
- 1 x 公对公跳线
Click the links in the list above for descriptions of the different components.
Note: The resistor you need can be different from what we use depending on the type of LED you use. Most small LEDs only need a small resistor, around 200-500 ohms. It is generally not critical what exact value you use, but the smaller the value of the resistor, the brighter the LED will shine.
在本章中,我们将继续构建上一章中构建的电路,因此您会认出上面列表中的一些零件。
Building the Circuit
现在是时候在我们的面包板上构建电路了。我们将以上一章创建的电路作为起点。
If you are new to electronics, we recommend you turn off the power for the Raspberry Pi. And use an anti-static mat or a grounding strap to avoid damaging it.
Shut down the Raspberry Pi properly with the command
pi@w3demopi:~ $ sudo shutdown -h now
After the LEDs stop blinking on the Raspberry Pi, then pull out the power plug from the Raspberry Pi (or turn of the power strip it is connected to).
Just pulling the plug without shutting down properly may cause corruption of the memory card.
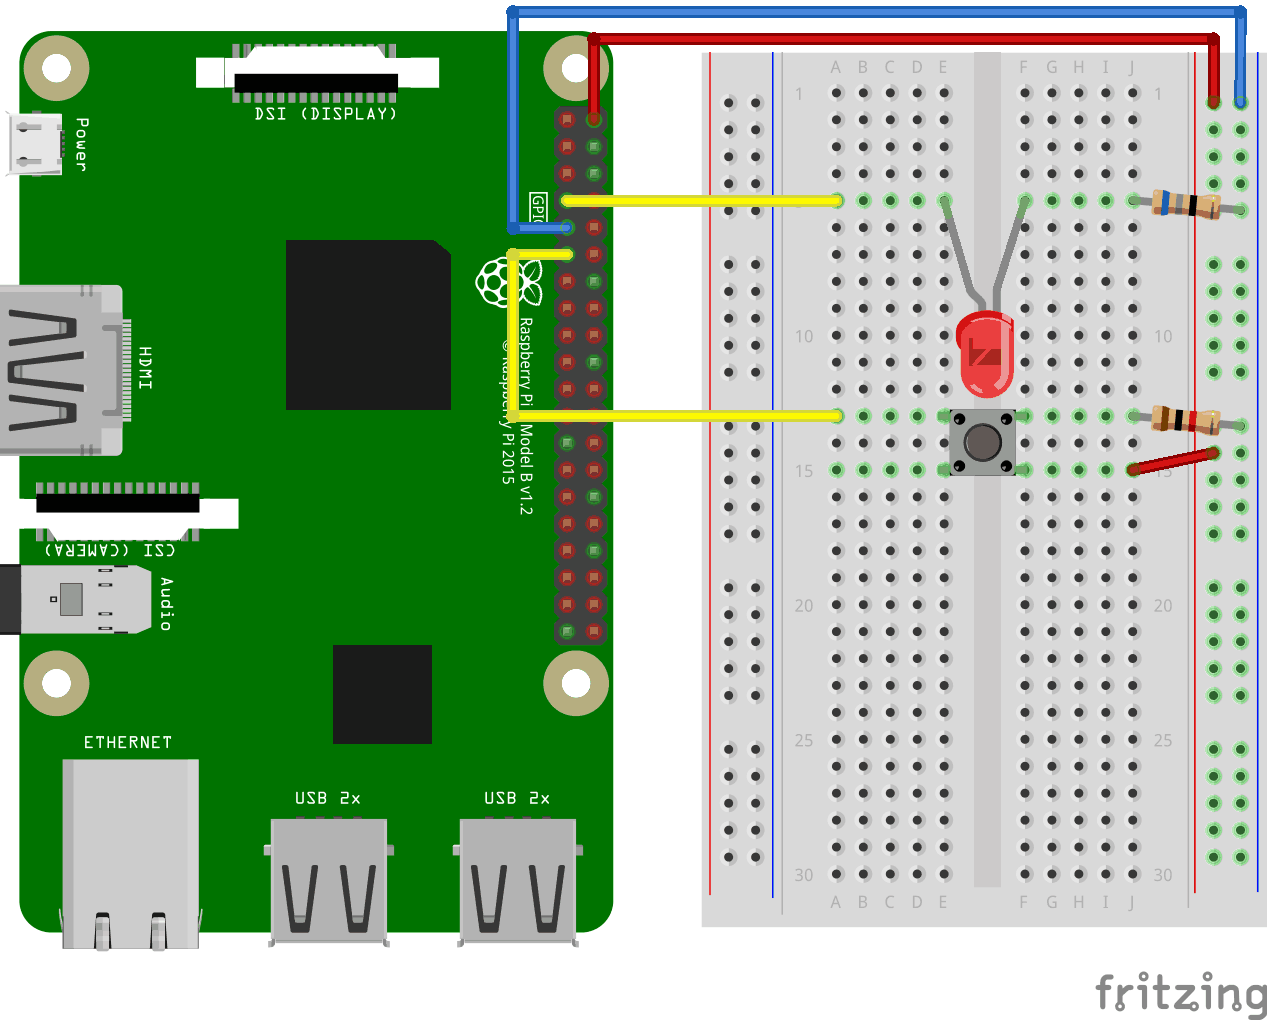
Look at the above illustration of the circuit.
- 从上一章创建的电路开始
在 Raspberry Pi 上,将跳线的母端连接到一个 5V 电源引脚。在我们的示例中,我们使用了物理引脚 2(5V,第 1 行,右侧列) - 在面包板上,将连接到 5V 电源的跳线的公端连接到右侧的 电源轨。面包板的整列是连接的,所以行号无关紧要。在我们的示例中,我们将其连接到第 1 行。
- 在面包板上,放置按钮,使其跨越沟槽。在我们的示例中,它连接到第 13 行和第 15 行,E 列和 F 列。
- 在面包板上,将 1k 欧姆电阻的一条腿连接到右侧的 接地轨列,另一条腿连接到与按钮右侧其中一个腿相连的右侧接线柱行。在我们的示例中,我们将一侧连接到第 13 行,J 列,另一侧连接到最近的 接地轨孔。
- 在面包板上,将一根公对公跳线从右侧 电源轨 连接到与按钮另一条腿相连的右侧接线柱行。在我们的示例中,我们将一侧连接到第 15 行,J 列,另一侧连接到最近的 电源轨孔。
- 在 Raspberry Pi 上,将跳线的母端连接到一个 GPIO 引脚。在我们的示例中,我们使用了物理引脚 11(GPIO 17,第 6 行,左侧列)。
- 在面包板上,将跳线的公端连接到按钮腿上直接跨越 地线 连接腿的左侧接线柱行。在我们的示例中,我们将其连接到第 13 行,A 列。
Your circuit should now be complete, and your connections should look pretty similar to the illustration above.
Now it is time to boot up the Raspberry Pi, and write the Node.js script to interact with it.
Raspberry Pi 和 Node.js LED 和按钮脚本
转到“nodetest”目录,并创建一个名为“buttonled.js”的新文件。
pi@w3demopi:~ $ nano buttonled.js
The file is now open and can be edited with the built in Nano Editor.
Write, or paste the following
buttonled.js
var Gpio = require('onoff').Gpio; //包含onoff以与GPIO交互
var LED = new Gpio(4, 'out'); //使用 GPIO 引脚 4 作为输出
var pushButton = new Gpio(17, 'in', 'both'); //使用 GPIO 引脚 17 作为输入,并处理“both”(按下和释放)按钮事件
pushButton.watch(function (err, value) { //监视 pushButton GPIO 上的硬件中断,指定回调函数
if (err) { //如果有错误
console.error('发生错误', err); //将错误消息输出到控制台
return;
}
LED.writeSync(value); //根据按钮状态(0 或 1)打开或关闭 LED
});
function unexportOnClose() { //程序退出时运行的函数
LED.writeSync(0); //关闭LED
LED.unexport(); //取消导出 LED GPIO 以释放资源
pushButton.unexport(); //取消导出按钮 GPIO 以释放资源
};
process.on('SIGINT', unexportOnClose); //用户通过 Ctrl+c 关闭程序时运行的函数
Press "Ctrl+x" to save the code. Confirm with "y", and confirm the name with "Enter".
Run the code
pi@w3demopi:~ $ node buttonled.js
现在,按下按钮时 LED 应该会亮起,释放按钮时会熄灭。
End the program with Ctrl+c.